In addition to guest posting on the UpCity blog, One Click SEO is featured as one of the Top SEO Companies in New Orleans. Check out their profile here.
Having accurate and detailed schema on your website is becoming more and more critical for Search Engine Optimization. If you are responsible for ranking a website in a hyper-competitive niche such as real estate, going the extra mile and having detailed schema may the factor that helps it rise above the competition.
Marking up your pages with Structured Data can seem like a complex task for some people. But, with a little help, adding Schema to web pages can be a little less challenging. As you learn about Schema and what Google likes, over time things start to fall in place.
Why Use GTM?
If you are an SEO Agency and challenged with ranking a website that you don’t have full control over or that is not a WordPress site, utilizing Google Tag Manager is a very effective way to get your much needed schema on the pages. Also, once you become comfortable, you can roll out schema on multiple pages using variables, which is a huge time-saver.
Tools like Google Tag Manager have the power to make Schema implementation easier for some and more confusing for others. We will point out some other tools that can help with using Google Tag Manager for Schema markup.
Helpful Tools for Schema
Most of us that use GTM already use the GTM Tag Assistant extension for Chrome. I recently found a few other great extensions that are quite helpful. The one that I use the most is the GTM Copy Paste extension from Julien over at Measureschool.com. It is a handy little extension that allows you to copy Tags, Triggers, and Variables from one container and paste them into a different container.
In the past, the container would need to be exported and then imported. Copy and paste is a much quicker method for sharing variables, triggers, and tags between containers. This is a great tool for those who manage multiple GTM accounts. The other extension I have been using regularly is the GTM Variable Builder. It allows you to create javascript variables in GTM that can be used dynamically across many pages.
Injecting Schema with GTM
To use GTM to inject Schema with dynamic variables follow the steps below. This will be a simplified example for demonstration purpose. Your results may vary as each website platform is a little different. A tweak here or there may be needed for the process to work with your site.
The first things to do is launch the Chrome Web Store and install the extensions.
- GTM Tag Assistant
- GTM Variable Builder
- GTM Copy Paste(optional)
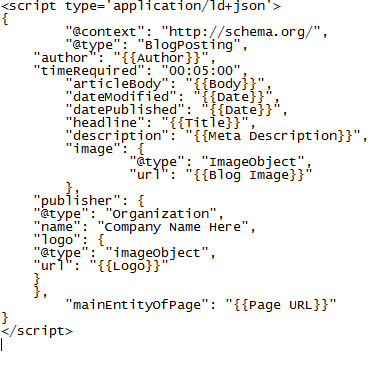
Next we are ready to start building some Schema with variables. Let’s use “BlogPosting” Schema for this example. The code below was created as a template using the Schema App JSON tool.

This is not a perfect “BlogPosting” markup by any means. Simply an example for this demonstration. What we will focus on are the values in the brackets {{xxx}}. These are the variables that we are going to use with our markup.
For simplicity we are going to set up the {{Author}} variable using the GTM Variable Builder. GTM has some variables available such as {{Page URL}}. These can be configured in the GTM container. To make the {{Author}} variable we will have to create a New User Defined variable.
Injecting the Tag on the Page
Once the extension is installed all that needs to be done is open the page (or pages) you wish to use the variable on. In this case it would be the blog pages.
We only need one to build the variable but it should be checked for functionality on all pages.
Once on the blog page open the developers console in Chrome as the GTM Variable Builder extension works with the dev console.
The GTM Variable Builder works by highlighting the text you wish to turn into a variable. Highlight the author and click on the extension. Don’t forget to test the code for the variable in the console. The first one is to use in the console. The second one is for setting up the Custom Javascript Variable in GTM. If the first one returns the proper value in the console the second one should work via GTM.
Copy the second code provided in the console and head over to GTM. In the container you are working in create a new variable. In this case we want a Custom Javascript Variable.
Paste the variable code into the the code box and save the variable.
Use the GTM preview to verify the variable is working. You should see the Author as a variable in the GTM preview window.
This variable is now ready to use in our Schema markup. The value of {{Author}} will be dynamically filled when the Schema is injected into the page.
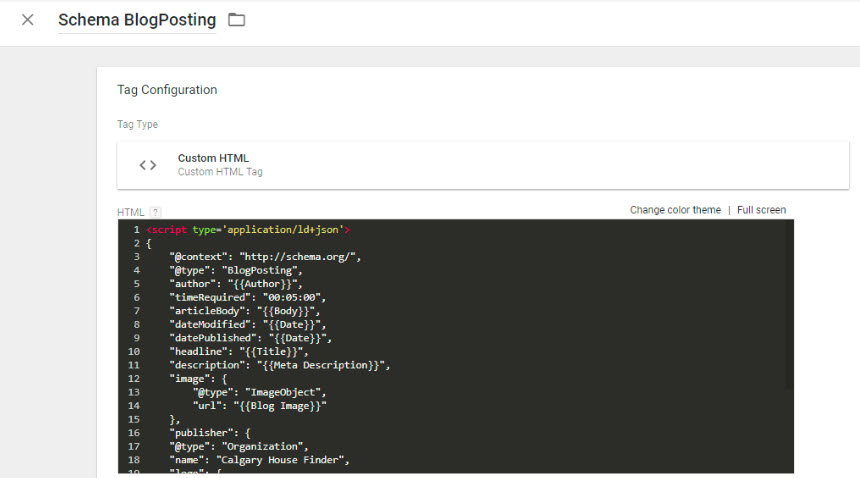
To use the variables with the Schema markup create a tag for the BlogPosting schema. It should be an HTML tag. Paste the markup directly into the tag and add the variables you have created.

This variable is now ready to use in our Schema markup. The value of {{Author}} will be dynamically filled when the Schema is injected into the page. To use the variables with the Schema markup create a tag for the BlogPosting schema. It should be an HTML tag. Paste the markup directly into the tag and add the variables you have created.
Set Your GTM Triggers
Set your triggers appropriately for the type of Schema and the pages to fire the tag on. In this case the website has a blog section /blog/. This tag would be set to fire on all pages that contain /blog/ in the URL path. Not every website will be that easy. Your situation may differ from this one and may require some extra effort. In the end this can be much faster than adding Schema to each page one at a time.
Final Testing
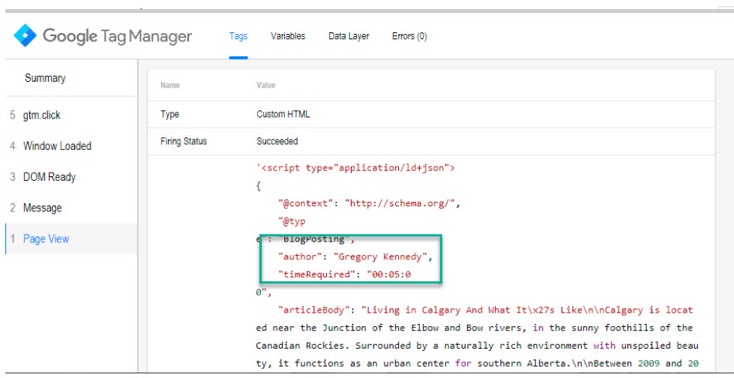
To test the Schema tag and the variables, go back to the GTM preview. Click on the pageview and then the schema tag. There you will see the whole schema markup and the values the javascript variables pulled from the page. If you notice some added “/” and “\” there are ways to remove some of those characters. A little bit of investigating and practice can resolve the text and URLs to a more human friendly format. There are plenty of tricks to learn with javascript.
It may take some time to get things correct. Especially if you are just starting to mess with Schema and javascript variables. None of these methods are 100% perfect. But, with a bit of persistence you can get it.
Why Not Just Use a Plugin?
Many people often use plugins for Schema. However, most plugins are limited at what they markup and they are not perfect. Some of them even go as far as adding sections to a webpage that you may not like. For this reason I prefer to add Schema to websites manually being either directly on the pages or through Google Tag Manager.
As easy as these methods are I find no reason to alter the theme files or any php files. There is always another way. The tools mentioned here are just a handful of the tools available. Do some research, read the articles, and give it a try.
Limitations in Verifying
There are some limitations to using GTM for marking up web pages. For example, when using GTM to inject schema into a page, you cannot use the Google Structured Data Testing Tool to verify via that URL. Good news is Google Search Console can and will see the schema being injected into the page.
This was not always the case though. Merely a year or so ago, Google’s Structured Data Testing Tool could absolutely see all the Schema being injected via GTM. After an algorithm update in late 2017 that changed. The code can still be checked with the GSDTT as a code snippet.
By checking the code snippet in the tool you can be sure that there are no errors or warnings before placing that code on the webpage. Once Google crawls the page you will see the markup in GSC.


